How can you have a better connection at the catch? Robin Williams breaks it down and shares his key tips and drills to help
The Connection is probably the hardest part of the stroke cycle to describe and the trickiest part of rowing technique to learn because it needs really good feel, and boat awareness. Except that when you talk to the best rowers, the ones who already have great technique, they all say it’s simple, and more straightforward than we think. The first 10 degrees of the stroke is the critical part because if you get that part right, the rest normally develops well; whereas a poor connection will severely brake the hull and make the stroke feel heavy. It is worth getting it right, but what do the top rowers do better than the others? How do they picture it and what does it feel like to them? Let’s try to understand what’s going on.
There are some obvious differences between the catch and the finish. At the catch the handle is in view, but the spoon is out of sight towards the bows; your legs are tucked up beneath you, and balance is sensitive, so hand-heights matter a lot, as do body position and the final movements on the slide. Compare that to the finish, where your legs are flat and your mass is stable. You can see everything: legs, spoon, and each other, and critically, there is time there too. Within reason you can sit as long as you want in the finish position and watch your puddle disappear past the stern, but the same is not true at the catch. It is not somewhere you can stop because, of course, it is in the middle of a sequence of movements.
So, the best rowers understand three key elements – how to arrive, how to enter, and how to connect up. When you can feel how these three parts combine then the beginning starts to feel easier to master, even at a high rate.
Nine common arrival mistakes
Common errors at the front end include:
- Sliding in too fast
- Over-reaching at full slide
- Dipping at full slide
- Blade sky-ing
- Head dropping
- Outside shoulder over-twisting (sweep)
- Handle dipping as you square the blade
- Over-compressing
- Posture failing at full compression (‘tucking under’).
All of these technical errors will slice speed off the hull on arrival because they all add unwanted extra movements and extra weight to the stern of the boat. Even a small head movement can add a few kilos to the stern and if you are in a single scull weighting 14-15kg that is very significant.
Being still at the front-end has to be one of our main aims, with the only movement being the last few inches of slide. Even top rowers are guilty of some of these errors at times depending on conditions, crew cohesion, rate, and other things so everyone needs to be aware of them.
Six entry mistakes
- Rowing the blade in
- Stiff arms, tight shoulders and elbows
- Trunk opens as blade enters, or
- Legs move away prematurely
- Spoon under-square or not fully prepared
- Spoon goes too deep or too shallow.
Three useful tips: wheels, balance, and slack
1 – Wheels
The first tip concerns the movement of the legs through the front end. Try to let your legs control the timing of your hands, because the window for the entry is right in between the arrival and the departure of the seat. If you picture the last few turns of the wheels forwards and the first few turns back toward the bows, these horizontal seat movements also move the handle(s) horizontally, so if you are tense or hesitant with the vertical entry movement, the legs start without it, drawing it horizontally, and cause you to miss the window.
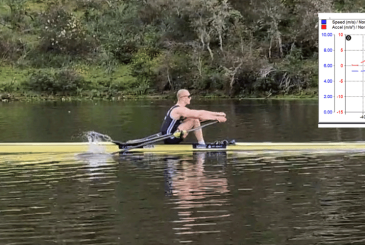
A great video to watch this is the classic one below of Olympic gold medallist Zac Purchase sculling steadily in his single.
2 – Balance
The second tip concerns balance: during the recovery, whilst sliding, balance is available both in the feet and the hands. The downward weight on the handle to keep the spoon off the water helps you feel the balance in the feet as you slide. However, the time comes just after squaring up when that handle weight has to be released to allow the entry, so at the moment of entry you only have balance in the feet.
You need to be ‘on your feet’ at front stops, not off balance, and this is why slide-rushing, shoulder tension, over-reaching, dipping etc cause great problems. They stop the hands from releasing the handle weight in a relaxed and skilful way, and instead mean the entry is slower, late and stiff. This makes it hard to feel that the spoon has set at the right depth too, so when the leg push comes the spoon can dig deep or wash shallow.
3 – Slack
The third tip is about ‘slack’: we need slack, or looseness, in the oar and arms for the spoon to enter the water well. Stiffness doesn’t work and yet it is tempting to pre-engage or tighten as you get near the entry because your brain anticipates the effort you are about to make. Once you accept that looseness into the water is okay, it creates much more of a sense of calm and patience. Of course, once it is in, you need to instantly remove that slack by connecting hands, feet, spoon and hips together. Double Olympic champion Alex Gregory talks about letting the spoon ‘fill up’ before applying the work. We’ll look at how to take up the tension further on.
Drills for skills
Try practising these drills – they help develop the arrival, and entry skills.
- Sit at front stops and do dips, covering and uncovering the spoon with the hand movement, whilst sitting still. Make sure the shoulder joint is free to articulate and the elbows are soft
- Roll-ups to the entry, from backstops.
- While rowing, ‘cutting the cake’, also known as ‘air strokes’. You row a double recovery without letting the spoon touch the water and it tests whether you can go to half slide, three-quarters, and then full slide whilst keeping in control of the balance and your stern-ward mass.
“The message is that the seat controls the timing, not where you can reach to”
Video analysis
In terms of measuring or checking your technique, video is very useful here. From a video paused at three-quarters slide, advance one frame at a time. Spot the last frame forwards and the first one as the seat changes direction – then have a look at the spoon. Most people will still be mid-entry and so are out of time with themselves!
The message is that the seat controls the timing, not where you can reach to. When the seat arrives so should your spoon; when the seat pushes, the stroke starts so make sure you adjust your entry timing to fit your seat pattern.
Connection
So, what about the feeling of the connection? Like most skills it is best to make it simple to start with. The rowing machine, for all its other deficiencies compared to a boat, does have an almost perfect feeling of connection because there is very little slack or wasted movement. There is no oar to balance, square up, and enter – you get a connection to the flywheel whenever you change direction, which makes it very easy. If you close your eyes when rowing and imagine being in the boat then you will see what I mean.
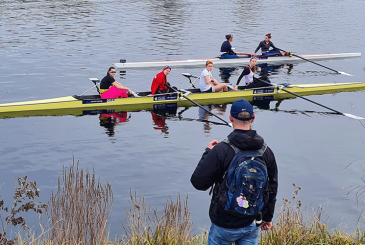
The video link here shows Polly Swann (GB W2- 2021) and coach, Hamish Burrell, doing some connection practice before the Tokyo Olympics. Polly does some strokes without the handle to establish the leg rhythm, and then some where he holds it at the catch to allow her to pick the moment to engage. Finally, she takes the handle and rows continuous strokes.
The reminders for her are to stay controlled and relaxed in the slide and the hands, but to engage the lower trunk to be ready for the instant the pressure comes on. Your lower trunk posture is the part of you which you can and should pre-engage but keeping the hands and feet light and relaxed. So, engaging well is a key part of the connection.
Suspension
Let’s picture a stationary boat with the crew about to row off. This first stroke is potentially the best one, at least from a timing perspective because everything is where you choose it to be. A good connection needs four timings points to synchronise:
- Spoon in the water and ready
- Handle forward and ready
- Feet planted and ready
- Hips forward and ready
On the ‘Go’ it is quite easy for these four points to instantly connect to each other. It takes a blink of time. This connection, the catch, is a small movement and is not reliant on how hard or fast you try to be. It works because everything is in the right place at the right time. As soon as we complete stroke one, there is scope to fractionally lose each other’s movements, or the speed of the boat, by the time you return to the front again for the next one.
In a way this is the skill of rowing – the technique is quite simple, but to execute repeated strokes at power in complete synchronicity is quite tough. Each person needs good control of their length, power, and sequences plus the skill to be able to row with the crew. The simple aim for stroke two and the rest is to get back to the water with those same four contact points all synchronised each time.
Eight connection drills
So, more practice is needed! Some progressive connection drills are as follows, starting simply, then moderately skilful, and finally advanced:
- Back down stroke – boat going backwards, enter the spoon and feel it fill up with pressure – but don’t take a stroke yet.
- Back down with hip suspension – as above, but resist the spoon with your foot pressure and the handle pressure with your chest. Your hips should lift a couple of centimetres clear of the seat. This shows you have a full connection to the water.
- Front end dips – this is to practise entering.
- Roll-ups from backstops – to practise arriving and entering.
- Roll-up and nudge – to practise arriving, entering, and connecting.
- Now try on the move: using legs-only rowing, row the first third of the stroke (no trunk or arms).
- Repeat number six, but with full pressure. Keep the rate very low and get each individual stroke right. See if you can maintain technique whilst applying force.
- Lastly, repeat six again, but at a high rate, say rate 34-36. See if your technique holds up while moving quickly.
These can be done with some of the crew sitting the boat or the whole crew rowing, depending on your level.
If you can get to number eight above then in theory you have all the positions, sequences, timing points, control, and rhythm to do the same using full length rowing. In practice it’s not quite that easy, but the more confident you get with these processes, the nearer you are going to get to one of those ‘light bulb moments’ when you realise that after all, it is quite simple!
As long as you organise well off the back-end, allow the front-end timing to come from your seat, keep a relaxed entry, then finally engage well, you should have a top class connection!
Take it further
For more details, watch Robin’s video explaining the connection from his Facebook page here.