The blade is a great barometer for the rower, explains Olympic coach Robin Williams.
Coaching the blade rather than the person can sometimes work very well because it can’t answer back and is only doing whatever the rower makes it do, so there should be less room for argument! The rower can often see the blade do something and correct it when they can’t necessarily feel the error in their own body movements. Of course, the blade is the tool with which we move the boat. If it’s well controlled, long, accurate on the entry, with early pressure, held right to the finish, then arguably the human on the other end can’t be too bad!
Coaching legend Ron Need’s technique video from the 1990s had some great footage of blade work by the Redgrave/Pinsent coxless pair; minute after minute of the spoons gliding forward, burying crisply and locking a clear lump of water instantly on the face. It was evident that what the two people on the other end were doing was something pretty special.
The ‘what to do’ with an oar is simple geometry since it’s just a lever:
- The oar needs an arc of about 85-90° for sweep and 110-115° for sculling. If you have a biomechanics system it will measure this for you, but if not you can still measure out the angles and mark them. In the GB Rowing Team we have used straws on the saxboard, cable ties on the rigger, bent coat-hangers – anything you can attach which says ‘the stroke begins here and ends there’ and provides a reference for the rower.
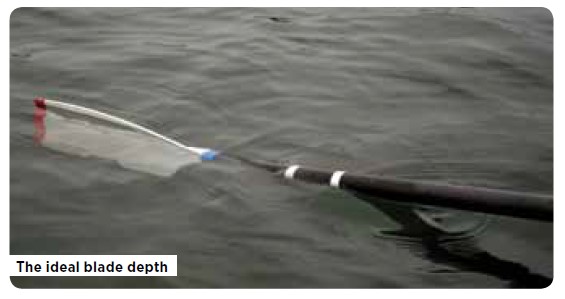
- The blade needs to be at the right depth to avoid wasting energy vertically and tape on the neck of the oar is a good cheap visual check to see that it tracks level through the stroke (see photo below).
- The entry and catch should be achieved with minimal slip, ideally less than 5° being lost with peak force being established within 20° of the entry point. This is hard to measure without instrumentation but you can do roll-ups with a catch and ensure that it is the boat which moves rather than the water around the spoon. A straw on the stern is another way to ensure that hull speed is picked up well.
The ‘how to do it’ is best approached with some clear ideas first:
Don’t pull through the water
Since we want to fix the spoon and lever the boat past it, we shouldn’t try to pull it through the water at all. The old analogy of rowing down an imaginary line of fenceposts is still a useful one; each time the blade enters the water you imagine it fixed behind the post and lever the hull past it. Try looking at the bank whilst rowing and just as you reach front stops pick an object beyond the end of the spoon, (e.g. a branch or stone) and see if you actually get the blade covered right there or whether you slip back past it.
Push it!
The blade is designed to float at the right depth and will track level through the stroke if you allow it. Your leg drive should be low and at a similar level to the blade, whereas your shoulders and arms are much higher so lifting the body and/or pulling too soon (as opposed to pushing) are the most common causes of erratic depth. Pushing first lets the oar set itself much better.
Two kinds of pressure
When the spoon enters the water the catch is made by a fast light pulse from the feet. This locks the spoon so it will momentarily also make the handle look still. The main leg drive then moves the hull with a firm steady shove, so the handle will move when the hull moves.
Let the finish come to you
Many people pull on to the handle or pull the spoon out of the water when it’s still loaded and end up with a messy finish and probably sore wrists too. The oar enters the water ‘slack’ and is then bent – you need to feel the oar unbend just before it leaves the water. A good tip is to let the puddle leave the spoon rather than take the spoon away from the puddle.
So it’s a simple case of cause and effect:
- If the spoon skies, your hands are going down instead of up.
- If it digs deep then you are almost certainly lifting your back or pulling too soon – if it begins to wash out then you have lost your connection and your body weight is back down on the seat.
- If it tears out and the finish is bumpy then you’ve pulled the spoon out too soon when it still has pressure attached.
- If it overshoots the entry then you haven’t sequenced the recovery properly because you are adding reach at the front end.
The blade shows up all your mistakes so correct the blade and you just might correct yourself.
It’s worth practising blade control and skill exercises for all these reasons. The mass of the oar is tiny compared to your own body weight so it amplifies your mistakes and hence is a good barometer of your rowing.
One final point to mention is rig: the pitch needs to be correct (usually 4-5°) if you are to push and hang off the spoon in a relaxed way. If it’s wrong you will spend valuable muscle energy forcing it to maintain its level. Also gearing: too hard and you’ll never feel the acceleration you’re after, too light and you’ll probably tear through the water.
Blade drills
There are countless blade drills you can do and it’s time well spent because you can coach yourself, or at least your oar!
- Relaxation: Open fingers recovery, dips at entry, finish.
- Timing: Roll-up as you arrive at front-stops.
- Catch: Roll-up and take flex on the oar.
- Balance: Inside/outside hands rowing (scullers move grip down handle).
- Speed: Double finish (‘cutting the cake’).
- Depth control: Outside hand moved down next to inside one.
- Dexterity: Square blades, 360° oar roll in recovery.
- Acceleration: Inside arm rowing, changing to both arms.
This article was first published in Rowing & Regatta magazine in November 2010.
Photo: Benedict Tufnell