How can you achieve good finishes in a boat? Coach consultant Robin Williams focuses on the finer detail and suggests drills to sharpen your technique
Previously we looked at seven reasons why the finish is an important reference point in the stroke cycle and how it can set up the next stroke – see that article here.
Some crews use exercises like single strokes or paused finishes to help cement the technique, while others like to emphasise more fluid movements. Whichever school of thought you subscribe to, we all want effective finishes plus a strong rhythm so there’s a need for both mechanical correctness and movement skill.
This time I am looking at the finish some more and exploring how it is actually created, because its foundation is made well before we actually arrive at that point of the stroke, of course.
The irony is – the better job we do from the catch, progressively building the stroke – the greater the challenge we set for ourselves at the end. All that length, leverage and acceleration of mass will culminate in a long and powerful finish, but the body mass wants to keep on going, so there’s a risk of tipping backwards – or getting stuck and catching a crab. Because no-one wants these problems, they find ways and means of avoiding them such as leaning away from the rigger, washing out, collapsing the release, or simply taking pressure off early. But these also come with consequences: poor acceleration means poor rhythm and rowing short means a slow boat, so naturally they are not recommended! The actual solution is rather more helpful.
Movement chain
If you sit still in a perfect finish position, it is worth thinking about the sequence of movements you went through to end up there and how it felt – a reverse order look at the structure of the drive.
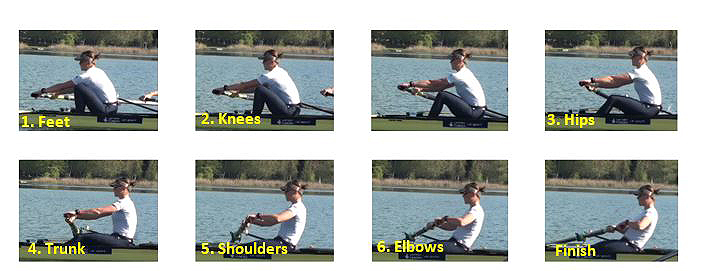
There are six elements to it:
- The last part of the handle draw comes from the elbows (6).
- The elbow pull get its power from retracting the shoulders (5).
- The shoulders gain acceleration from the opening of the chest (4) as it overtakes the hips.
- The hips (3) are being driven by the knees pushing them bow-wards, and the knees (2) get their squeeze from the feet (1) pushing against the fixed stretcher.
Each of the movements relies on the previous one, all the way back up the chain to the catch position where it all begins. They develop in a smooth and incremental sequence from the footboard to the finish. The trick is to stay in that sequence because if you use a movement out of turn, like breaking the arms early, or opening the trunk too soon then you compromise the finish long before you actually get there.
Surely the hands pull too?
As with a bench pull in the weights room, the forearm is a fixed length, so although the hands grip the bar, the elbows pull it past the trunk to the bench. It’s the same with the oar handle.
I find it is better to think about ‘elbows pulling to the bows – feet pushing away’ than pulling with the hands, which can lead to shoulder ‘hunching’ and ‘wristy’ finishes. This reverse look at the sequence is helpful because it allows us to picture the end result of ‘a good finish’ and then to see the logical order we go through to get there.
“The adage that ‘You can only make each movement once’ is worth remembering”
A back-end build-up in the warm-up part of a rowing session is quite common: arms only, arms and trunk, a quarter slide etc, because the structure can be built segment by segment. A front-end build-up is also very useful (legs only, legs/trunk, legs/trunk/arms) and both drills help confirm the structure of the movement chain, from either the catch or the finish.
As for feel, the overall action is very much like the sequencing of a squat jump with the fixed footplate acting like the floor and everything developing pressure against it. The last part is like pulling the starter cord of a lawn mower – back/shoulders/arms. Quite straightforward in theory. So done in forwards order, the movement activation goes: Feet-Knees-Hips-Chest-Shoulders-Elbows. Each part propels the next joint down the line.
This is simple enough, but, in practice, we often see people get this order wrong and go: Feet-Arms… or Feet-Trunk… at the catch which will immediately destroy the ideal sequence and interfere with clean and progressive power. Rowers only do this because they are trying to catch some pressure, so the intent is right, but the method is not. The adage that ‘You can only make each movement once’ is worth remembering, so if you open your trunk at the catch, that movement won’t be available later when needed – it’s gone.
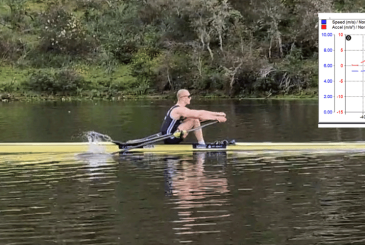
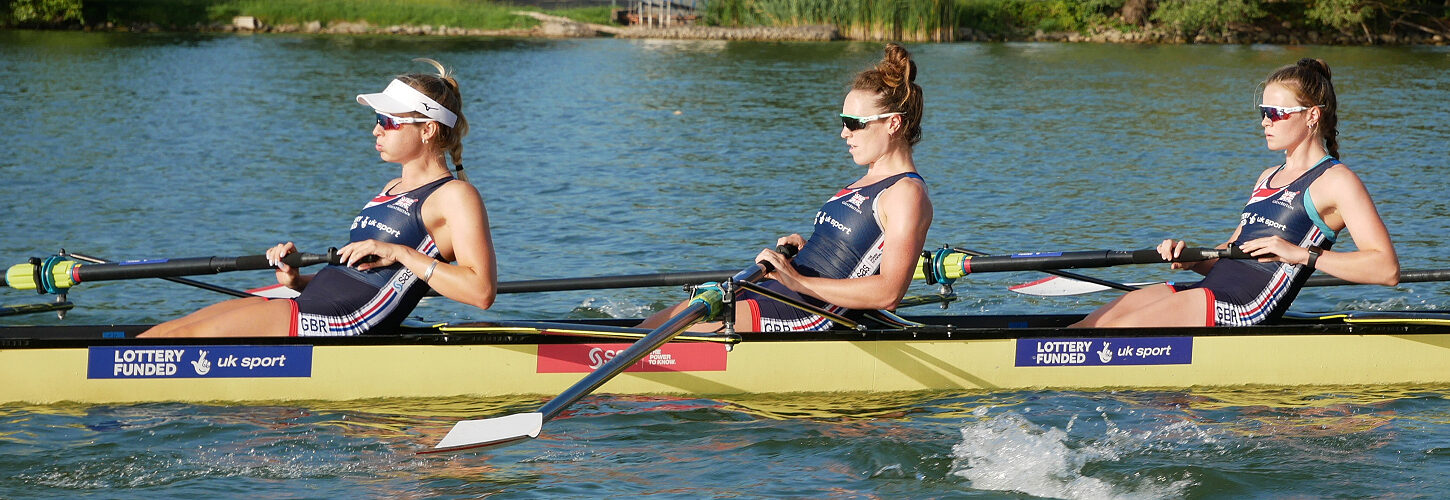
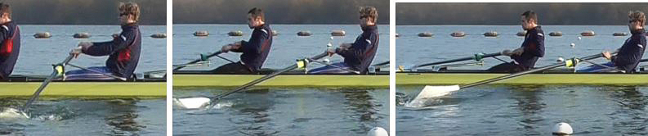
In the picture below, 1,2,3 are in red, indicating these are moving parts so far, and keep moving; 4 is next to join in.

Conclusion: the simplest way to have good finishes in a boat is to sequence correctly from the beginning. There is, however, a final detail when you get to the end and we also need to talk about what happens just after it. In tennis and golf, for example, the follow-through swing receives a lot of technical attention because it helps shape the preceding power delivery.
Recover off your own pressure
To end the power phase on balance needs us to accept one clear concept: to ‘recover off your own pressure’. Once you can do that it becomes much easier, and you can have your cake and eat it: a strong powerful finish and a smooth rhythmical recovery. The phrase means that the last few centimetres of pressure in the oar can be used to stabilise our mass, ready for the exit and recovery.
When the rower’s movements are complete – legs pressed flat, body back, handle drawn to the body – the oar has not quite finished because there is bend, stored energy, in the outboard part.
This last vestige of spoon pressure is enough to counter the rower’s own momentum to the bow. It can leave him or her sitting back, but stable and on balance at the finish. So, the rower finishes their own movement, and a moment later should feel the pressure leave the spoon, feet and handle simultaneously. That is the moment to shape the handle downwards and exit the spoon from the water.
Improving the finish
Recovering off your own pressure means understanding and feeling the interaction of the three main body segments: legs, trunk and arms. The video link with this article – see below – does a run-through of how to check this on the rowing machine and is a good place to experiment in your own time. Feet out rowing illustrates it well.
1. Row feet out LEGS only
At the end of the push the feet tend to come away from the shoes. This is expected since the job of the legs is to drive mass away from the stretcher. This is a problem for the finish but will be resolved in a minute.
2. Now, feet out TRUNK only
The same thing will happen and you will feel even more off balance at the end because your chest overtakes your hips and the body weight moves to the back of the seat. This positive acceleration is also a good problem to have.
3. Lastly, feet out ARMS only
This is part of the solution and is usually quite easy. The arms achieve two things: they contribute a bit more propulsive power, but importantly they pull your weight towards your feet rather than taking you further away from them.
Conclusion: we need the arms at the end of the stroke. When we put the three segments together into a normal stroke, the legs and trunk will produce the acceleration of mass we want towards the bows; the arms will hold us in contact with the feet and cancel any more bow-ward tipping.
Six more drills to try
1. Fixed legs finishes: a good drill to practise using the trunk swing and arm pull to send pressure to the stretcher at the finish. Focuses on steps 4,5 and 6 of the sequence.
2. Quarter slide is a great way to practise good finishes. You have 25% of the legs push, 100% of the trunk pull, and 100% of the arms pull, so it is easy to dynamically accelerate the trunk and arms against the last bit of legs and thereby create lots of handle speed, which in turn keeps pressure going to the stretcher and keeps you balanced at the release. The drill focuses on steps 3,4,5 and 6.
3. Single strokes, pause at the finish. Helps define the end of the pressure phase.
4. Front end build-up. Starting with legs only, and engaging, but not opening the trunk, it focuses on steps 1, and 2. As you expand the stroke you introduce steps, 3 and 4 onwards, until you have the full stroke.
5. Feet out, full length. Involves all steps 1-6, BUT don’t row too hard because the more push you apply to the front of the stroke, the more handle speed you will need at the end to stay in balance. Do try to row a decent length, do try to sit back a bit, and, in particular, don’t pull the chest in towards the handle at the finish (another common ruse!).
As you get used to the technique, start adding pressure to the stroke from the back end: the last quarter of the stroke, then the last half, then three-quarters, and finally from the beginning.
6. Feet out, square blades: a really honest drill that encourages good control of body mass at the finish and catch.
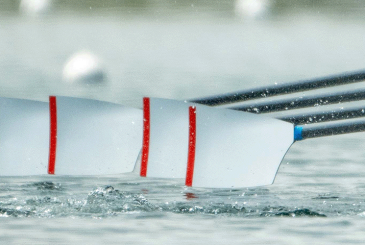
Blade work
Lastly, look at the oar itself. Sure signs that the finish was lost before you got there are when the spoon exits the water and flops on its back, throws up water, or makes a noisy, clunky exit.
If you think you’ve now got a good finish you should see the evidence in the language of the spoon and it should leave the water cleanly, quiet and square, with some downward handle shape, allowing you space and time to start lengthening out the arms into the recovery.
Thinking about how the spoon will look OUT of the water will help the way you finish the drive, and a good finish will naturally produce a rhythmical follow-through to the first part of the recovery.
For more of Robin’s technical advice and videos, head to his Facebook page here.
Photos: Getty Images, Nick Middleton and Robin Williams